

Easy Nail Art Designs At Home Without Tools For Beginners
What is to follow is a collection of easy Nail Art Designs that you can do at Home without Tools (even if you are a complete beginner!)
If you are like me, then you love having fun and easy DIY Nail Art. It can be a great way to transform your Nails and your look.
Even though Nail Art looks fantastic, and is hugely popular and in trend, you shouldn't need to have to head to a Salon to get your design done. That can be far too expensive and there's just no need with the right designs and the right tutorials.
Unfortunately, there are lots of Tutorials online, but few of them provide simple designs that are ideal for beginners. I'd like to change that for you today.
If you are looking for some Nail Art Designs that are easy to apply and can be down quickly, you're in luck!
Contents
- 1 Easy Nail Art Designs
- 1.1 Design 1: Ombre Illusion
- 1.2 Design 2: Polka Dots
- 1.3 Design 3 – Splatter Nails
- 1.4 Design 4 – Emojis!
- 1.5 Design 5 – Cheetah!
- 1.6 Design 6 – The Feather
- 1.7 Design 7 – Newspaper Nails
- 2 Final Words
Easy Nail Art Designs
I have personally researched, experimented and discovered Seven Easy Nail Art Designs that you can do straight away from the comfort of your own home.
I think they're really cute and what I love is that you can use things around the house to create these designs. Or you can buy a few items really easily so that you can create them in a few days time.
Designs 3-7 work best when you paint your nails in a foundation color first. I recommend that you paint your nails with a White Nail Polish (Essie is a great brand for this) before you begin with the Nail Art. Its also advised to apply a Top Coat(I like to use OPI) to seal in your design and ensure it lasts as long as possible.
Let me know which one is your favorite and if you recreate any of these do drop a comment at the end of this article!
So without further ado, lets get started
Design 1: Ombre Illusion

This is one of my favorites because it is so great for day to day wear. You can wear this for a variety of occasions and with a number of outfits. Its also really customizable.
This Nail Art is like provides an Illusion effect, and to create it you're going to need three different colors.
I usually like to create the Ombre Illusion with Blues colors, but you are going to want to make sure
that with the colors you choose, that they're all in the same color family. Its best with three different shades of the same color. This will give you the best effect.
Start of by painting your nail with your darkest color first.
Wait for that to completely dry and then take your second darkest color and paint down the middle of your nail.
Leave a little bit of that darkest color showing at the edges and then wait for the second coat to dry as well.
You're going to repeat this step with the lightest color in order to make smaller lines.
Just make sure there's less polish on the brush with your lightest color and use a lighter hand so that you're not pushing down too hard.
When it comes to the white line, take your brush and twist it to the side so that you are using the skinny part of the brush. Its great to drag your pinky along the surface of the table. This helps you create a straighter line and stop applying too much pressure on your hand.
Finally, add a Topcoat to blend all the colors together.
Design 2: Polka Dots

This is perhaps the easiest design on the list. But it doesn't mean that it is not one of the best and worthy of your consideration!
For this design, all you need is two different colors of nail polish and a bobby pin.
Start of by using your main color of polish to paint your nails. Cover your entire nail, this is the foundation for the design. Let that color completely dry.
Next, dip one end of the bobby pin into your second color. From there, you simply press the bobby pin against your nails to create polka dots.
You're going to want just lightly tap the nail with the bobby pin and then lift it straight up. Do not drag or this can cause smearing.
Its usually best to aim for around 2-3 dots from each dip of the bobby pin into your secondary color– if you try any more your design can look inconsistent.
You can add as many polka dots as you like, and you can also change the size of the dots depending on your preference. For my nails around 10-12 dots usually looks best!
Design 3 – Splatter Nails

For this design you're also going to need three different colors of paint or nail polish. Feel free to choose whatever colors you like and ones that you have lying about. Unlike the Ombre Illusion Design, you are not going to need three colors from the same color family.
You are going to need some plastic wrap and a piece of paper/little mixing tray to mix all of the colors together.
Start out by painting your nail in a foundation color. Painting them all White works really well for this. Once all your nails are painted, let them completely dry.
Then, scrunch up your little piece of plastic wrap and dip it into your lightest color (from the piece of paper/mixing tray).
Start pushing the plastic wrap onto your nail. It's going to look really messy and splattery which is the effect that you are trying to create.
Then using the same piece of plastic wrap, dip it into your second color and just do the same thing – pushing it over your nail.
You can keep layering all of your colors onto your nails until you're happy with the splatter design.


After, its best to clean up your nails. If you are using acrylic paint a cotton swab and water works well.
But if you have used Nail Polish, then you're going to want to use some Nail Polish Remover to clean up.
Then add a topcoat to make sure your design is nice and shiny and you're done.
Design 4 – Emojis!

Everyone loves an Emoji! If you don't simply skip this design because its based all around them!
Emojis can be a really fun Nail Art Design, and they are actually pretty easy to do, even for a beginner.
Start by painting your nails with White Nail Polish for the foundation first. Let them dry.
What you will need to do is to take a Ziploc Bag(Sandwich Bag) and paint a large area of it with yellow nail polish.
You need a yellow because that is the color of most emojis, but if you wanted to mix it up you could use other colors of course.
Next, cut out a little circle from your painted Ziploc Bag. This is going to go on your nail so you need it to fit.
It doesn't have to be perfect and nobody's going to notice the size, but you do need it to fit on! It helps to measure it out to ensure it fits on your nail.
Next, take some clear coat and paint over your nails.
Press the yellow circle on top whilst the paint is wet so that it sticks.
Then, use a secondary polish (red nail polish to create the heart eyes) and a bobby pin to paint the eyes on your yellow Emoji face circle.
This sounds difficult but its actually pretty easy.
Lastly, use a toothpick to create the mouth with a black polish. And you're done!
Design 5 – Cheetah!

This is a brilliant design, and the Cheetah nails look so good with any Cheetah style outfits that you may wear. Its also very easy to do by yourself.
All you are going to need is a black polish and a color that you love. I love working with a lime yellow green on this design.
Start by painting all of your nails in a white nail polish to create the foundation for the design.
With your secondary color (lime yellow green in my case) you are going to create dots all over your nail and then once they're dry, you are going to take your black nail polish and create the cheetah print.
With your black polish, you just want to press it onto your nail to create little splotches. This gives it the Cheetah effect.


If you want more precision you can use a toothpick but you could just stick to the nail polish brush.
Once you're finished, put on a topcoat so that your nail art lasts longer and looks super shiny.
And that is it.
Design 6 – The Feather

This is one of the more sophisticated designs, but it looks really impressive.
You can leave this design with a solid background, but it depends on your preferences.
I personally like to create a little gradient as in my opinion, this brings out the design a bit more.
So start off by painting your nails in your white foundation.
If you decide you want a gradient, you will need to use a sponge to tap on your secondary color to your nails.
Once you've foundation color/gradient is in place, create a curved line up your nail using black polish. This is going to be your feather.
I like to use a Striper but I recommend using a toothpick if you don't have one.
Start wisping out from the curved line with some paint – this create the wings of the feather.
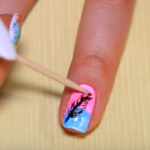
If you want like a really wispy feather then definitely stick to using a toothpick.
Add a topcoat and you're finished!
Design 7 – Newspaper Nails

The last design on this list is probably the quickest one to create!
Begin by painting your nails with a White Nail Polish – this is your foundation color.
Then, take some Rubbing Alcohol(make sure its 70%) and pour it into a small glass.
Dip your finger in the glass for about 10 seconds, ensuring all of your nail is submerged.
Next, take a piece of newspaper and press it over your nail.
You're going to want to hold it there for around 20 seconds.
Then, once the time is up, peel off the newspaper.
This will reveal the newspaper print on your nail!
You are going to want to seal this in with some Topcoat to finish and ensure it lasts longer.
Final Words
So there you have it, Seven EasyNail Art Designs that you can do at Home without Tools as a Beginner!
These are all really simple, yet effective and beautiful designs that you can create. They're also fully customizable and you can pick and choose the colors you want or that you have lying about the house.
This way, there's a lot more than just Seven Nail Art Designs above, there's countless combinations and styles that are there to experiment with!
Here's a final quick tip to dramatically speed up the entire Nail Art Process. While you are waiting for your nails to dry and they are still wet, dip them in Ice Water or Ice Cubes and this will instantly "freeze dry" them! Its a game-changer.
Let me know which one is your favorite by dropping a comment below.
Easy Nail Art Designs At Home Without Tools For Beginners
Source: https://www.almondnails.com/easy-nail-art-designs-at-home-for-beginners-without-tools/
Posted by: rankintwen1982.blogspot.com
0 Response to "Easy Nail Art Designs At Home Without Tools For Beginners"
Post a Comment